I like JSOM in SharePoint (at least more than alternatives). It gives the most complete client API to date (unlike REST) and adds automatic query batching on top of that - for free! One inconvenience though is that you cannot use same JSOM code both on client and on server - you have to switch to Powershell or C# CSOM (which often means rewriting same code in a different language)... But, no longer!
Table of contents
In this article:
- Using CSOM-Node npm package to run JSOM on server
- Using CSOM-Node inside an Azure Function
- Replacing azure-functions-pack with custom webpack build
- Creating SharePoint webhook to trigger Azure Function automatically
Full example can be found on Github.
Using CSOM-Node npm package to run JSOM in node
There's an awesome but not well known package out there called CSOM-node (made by @vgrem), which enables executing JSOM in Node.js context.
Usage example (copied from project docs):
var csomapi = require('csom-node');

var settings = {
    url: "https://contoso.sharepoint.com/",
    username: "[email protected]",
    password: "password"
};

csomapi.setLoaderOptions({url: settings.url});  //set CSOM library settings

var authCtx = new AuthenticationContext(settings.url);
authCtx.acquireTokenForUser(settings.username, settings.password, function (err, data) {

    var ctx = new SP.ClientContext("/");  //set root web
    authCtx.setAuthenticationCookie(ctx);  //authenticate

    //retrieve SP.Web client object
    var web = ctx.get_web();
    ctx.load(web);
    ctx.executeQueryAsync(function () {
        console.log(web.get_title());
    },
    function (sender, args) {
        console.log('An error occured: ' + args.get_message());
    });

});
Using CSOM-Node inside Azure Function
Of course one of the most relevant scenarios nowadays is running server side code in Azure - so in Web Jobs or Azure Functions.
I'll use an Azure Function in this example.
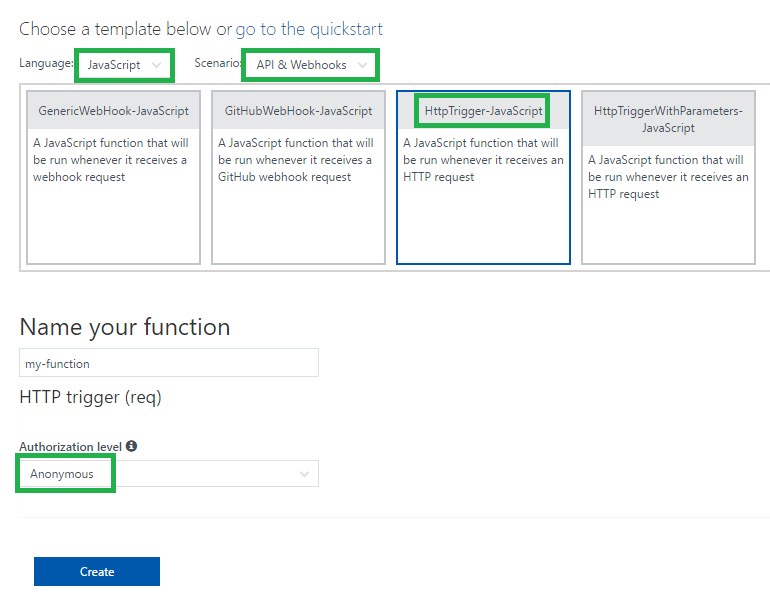
For our purposes, we can create "HTTP trigger" Azure Function like this:
Official documentation for Node.js Azure Functions is quite useful if you don't have much experience with them yet:
In brief, in Azure Functions, you must use special context object (I prefer naming it azureContext to differentiate from JSOM context) for the following things:
- Handling request and response
- Logging error/debug messages
- Notifying Azure that execution of your code has finished
Simplest example would be this code:
module.exports = function(azureContext) {
    azureContext.res = { body: "Hello world!" }; // setting up the response
    azureContext.done(); // notifying the Azure Function engine that we're done
};
Based on this knowledge, it's easy to transform the CSOM-Node code snippet to Azure Function form (see highlighted lines):
var csomapi = require('csom-node');

module.exports = function(azureContext) {

    var settings = {
        url: "https://contoso.sharepoint.com/",
        appClientId: "APP-CLIENT-ID-GOES-HERE",
        appClientSecret: "APP-CLIENT-SECRET-GOES-HERE"
    };

    csomapi.setLoaderOptions({url: settings.url});  //set CSOM library settings

    var authCtx = new AuthenticationContext(settings.url);
    authCtx.acquireTokenForApp(settings.appClientId, settings.appClientSecret, function (err, data) {

        var ctx = new SP.ClientContext("/");  //set root web
        authCtx.setAuthenticationCookie(ctx);  //authenticate

        //retrieve SP.Web client object
        var web = ctx.get_web();
        ctx.load(web);
        ctx.executeQueryAsync(function () {
            azureContext.log(web.get_title());
            azureContext.res = { body: "Success!" };
            azureContext.done();
        },
        function (sender, args) {
            azureContext.log('An error occured: ' + args.get_message());
            azureContext.res = { status: 500, body: "Error!" };
            azureContext.done();
        });

    });

};
Notice that I also changed authentication to App principal, so that we don't need to provide real user credentials. The app principal should be created via the usual routine - /_layouts/AppRegNew.aspx and /_layouts/AppInv.aspx as described in official documentation.
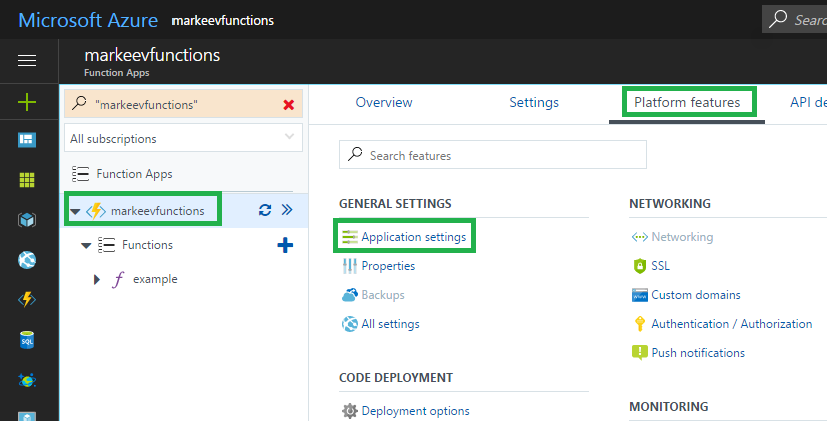
Instead of hardcoding App Client Id and Secret, good place for them is "Application settings" - they then will be accessible as environment variables (process.env.YOUR_VAR_NAME) in our Function:
Replacing azure-functions-pack with custom webpack build
One problem with Node.js Azure Functions is that somehow they run extremely slow if you have a lot of small files on disk. And if you use something from npm - you almost certainly have a lot of files under node_modules. CSOM-node is no exception - after I installed it to the cloud, cold start of my Function was easily taking more than 10 seconds (!).
To avoid this, Azure team created azure-functions-pack tool. With this tool, you can easily pack your function into a single javascript file. Unfortunately, there're several problems with that:
- azure-functions-pack is "experimental". It doesn't work well with every possible configuration and with every possible npm module. And for example at the time of writing it doesn't work on Mac at all.
- azure-functions-pack creates very ugly folder structure, where on the same level with function folder you get special
.funcpackfolder that contains the bundle. - With azure-functions-pack, it seems you cannot any longer change your Azure Function code from cloud IDE (because everything is basically replaced with the bundle), so supposed way of using this is that you debug locally and then publish, which is not always the optimal way of doing things.
So in overall, to be honest, I didn't like this azure-functions-pack thing. But like it or not, execution time of my Function improved about 20 times with the packed version. So it was obvious that bundling is still necessary - and I decided to try doing my own custom bundling, after all it's quite simple with webpack (azure-functions-pack also uses webpack for bundling).
But instead of bundling everything into one file, I decided to bundle only CSOM-Node lib and leave alone the main Function files, so that I can still edit them using cloud IDE.
I hit several problems trying to bundle CSOM-node.
Probably biggest problem was that internally it uses require to dynamically include SharePoint packages based on the loader options, and webpack doesn't like it. I didn't find any good way to force webpack to ignore those dynamic requires, so had to replace require with rather ugly eval('require'), but at least it works now and my PR to CSOM-Node was fortunately accepted, so you guys don't need to think about that anymore.
Here's the final webpack.config.js file I've got:
var CopyWebpackPlugin = require('copy-webpack-plugin');
var webpack = require('webpack');

module.exports = {
    entry: {
        'csom-node': './node_modules/csom-node/lib/csom-loader.js'
    },
    output: {
        path: __dirname + '/build',
        libraryTarget: 'commonjs2',
        filename: 'node_modules/[name].js'
    },
    target: 'node',
    node: {
        __dirname: false
    },
    plugins: [
        new CopyWebpackPlugin([
            { from: 'node_modules/csom-node/lib/sp_modules', to: 'node_modules/sp_modules' },
            { from: 'node_modules/csom-node/lib/auth/SAML.xml', to: 'node_modules' },
            { from: '*.js', ignore: ["webpack.config.js"] },
            { from: 'function.json' }
        ])
    ]
};
Notice that copy-webpack-plugin module is used for copying the utility files that CSOM-Node needs, and also my main js files and function.json to the output folder - so I can edit them in cloud IDE.
Resulting output folder:
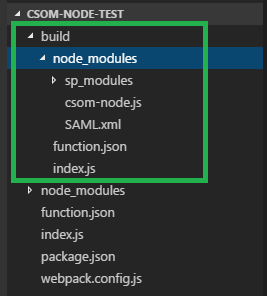
So basically CSOM-Node package was packed into a single JS file with several utility files, while main application files (in this example it is just index.js and function.json) were copied unchanged.
After I deployed it to Azure, it ran very fast, same as version packed with azure-functions-pack.
To configure this webpack build for your own project, you need to do the following:
npm init(if you don't have package.json yet)npm i -S csom-nodenpm i -D webpacknpm i -D copy-webpack-plugin- Create
webpack.config.jsand copy-paste the configuration code from above there - Bring
index.jsandfunction.jsonfrom Azure - Configure npm script for running webpack in package.json:
"scripts": {
    "build": "webpack --config webpack.config.js",
},
And then you can use npm run build to create the bundle!
Note: If you have more dependencies than just CSOM-Node, you can easily add them to this webpack build by adding corresponding records to entry block in the webpack config file.
Creating SharePoint webhook to trigger Azure Function automatically
SharePoint Webhooks is one way of triggering Azure Functions automatically (when something changes in a list). Alternatively you can trigger Azure Function for example when user presses a button (using XHR).
Detailed documentation about SharePoint webhooks is available on dev.office.com:
In order to be able to use webhooks, our Azure Function should implement special logic for handling validation requests. Fortunately, it's very simple logic and requires just several lines of code:
    if (req.query.validationtoken) {
        azureContext.log('Validation token received: ' + req.query.validationtoken);
        azureContext.res = {
            body: req.query.validationtoken,
            isRaw: true
        };
        azureContext.done();
        return;
    }
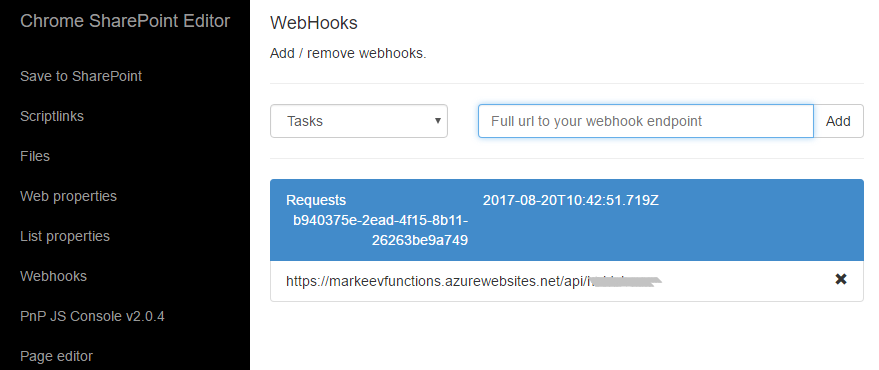
To attach a webhook to a SharePoint list, I'm using SP Chrome Editor (Chrome extension), where it takes literally 10 seconds to add a new webhook via a simple UI:
Alternatively you can add webhooks programmatically.
Conclusion
Azure Functions seem to be a perfect way to implement a serverless backend for SharePoint Online.
Having ability to use JSOM and JavaScript in Azure Functions allows simple code sharing between client-side and backend, quickly moving the code from client to backend and vice versa, so writing code only once in one language - which sometimes saves a lot of time!
Full example can be found on Github.
If you have questions, don't hesitate to drop a comment!
Comments
comments powered by Disqus