Some time ago I had to integrate my Meteor.js application with Skype for Business Online. I already worked with several Office 365 APIs before and haven't expected any problems. How naive of me! :)
Table of contents
In this article, I'm explaining how you can integrate a custom application with Skype for Business Online via the UCWA API:
- Create Azure AD Application
- Perform OAuth authentication and autodiscovery
- Initialize API session
- Retrieve user presence
- Monitoring events
Article has many code examples that you can run and edit. All examples were tested and work (at the time of writing, i.e. April 2017).
Combined code example for autodiscovery and authentication (with live demo of "Login with Skype for Business" button) can be found on Github.
End result
Here's the resulting application that I got:
Finally integrated #office365 #skype4b and my custom #meteorjs application. Have to say, #skype4b has the most complex OAuth flow I seen... pic.twitter.com/PM3WoEghsS
— Andrey Markeev (@amarkeev) November 20, 2016
Pretty nice, isn't it? But it took me about a week to figure out correct authentication and initialization flow (!). Hence hopefully this article can save you some time guys!
Create Azure AD application
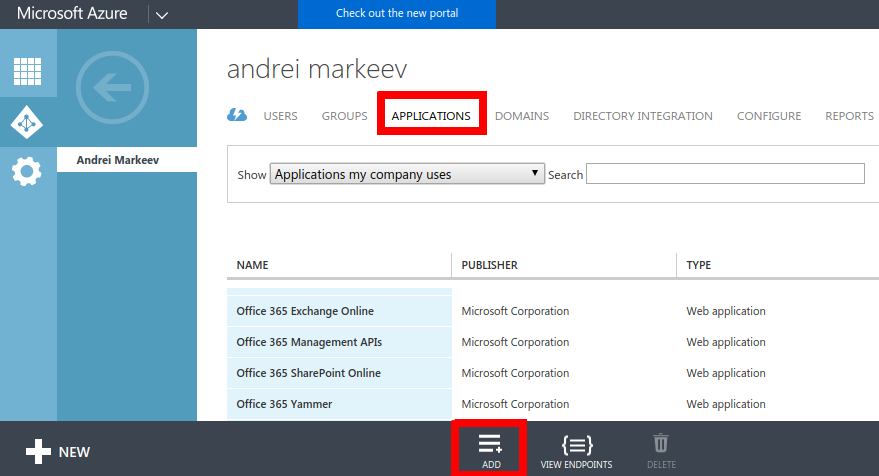
Classic Azure PortalNew Azure PortalGo to manage.windowsazure.com -> Active Directory -> Applications, and click Add on the bottom panel:
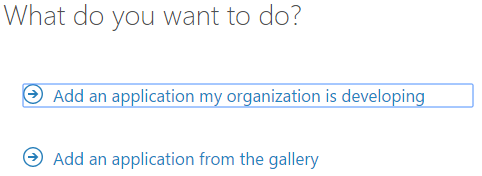
Select "Application my organization is developing":
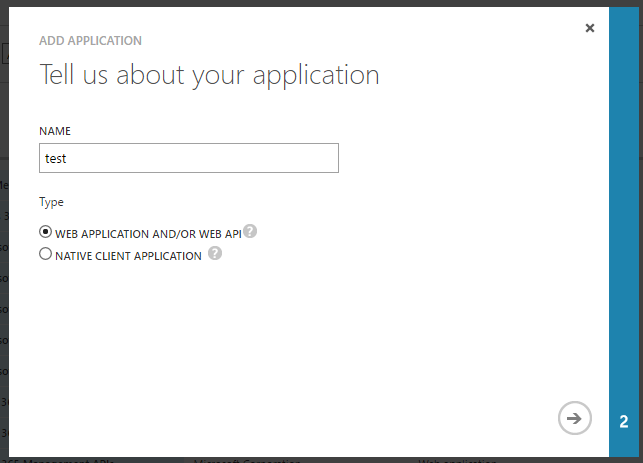
Enter application name and choose option "Web application and/or Web API".
On the next step:
- Enter sign-on URL. This is usually the URL of page where you have your "Sign in with Skype for Business" button. This url is also automatically added to reply URLs. You can change it at any time later.
- Enter application ID URL. Usually it is URL of your Office365 tenant + some identifier in the end.
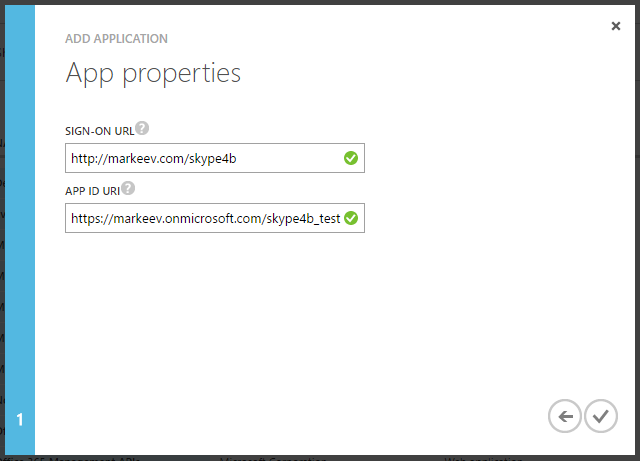
Finally click the check mark button to create the application!
Once application is created, it is necessary to configure it:
- Required permissions
- Reply URLs
- Implicit flow
- (optional) Multi-tenancy
Required permissions
We need to access Skype for Business Online, so we need to specify that our app requires this access. It is done by going to the newly created application -> Configure -> scroll down to "permissions to other applications" -> Add application.
You'll be presented with a dialog where you can select Skype for Business Online:
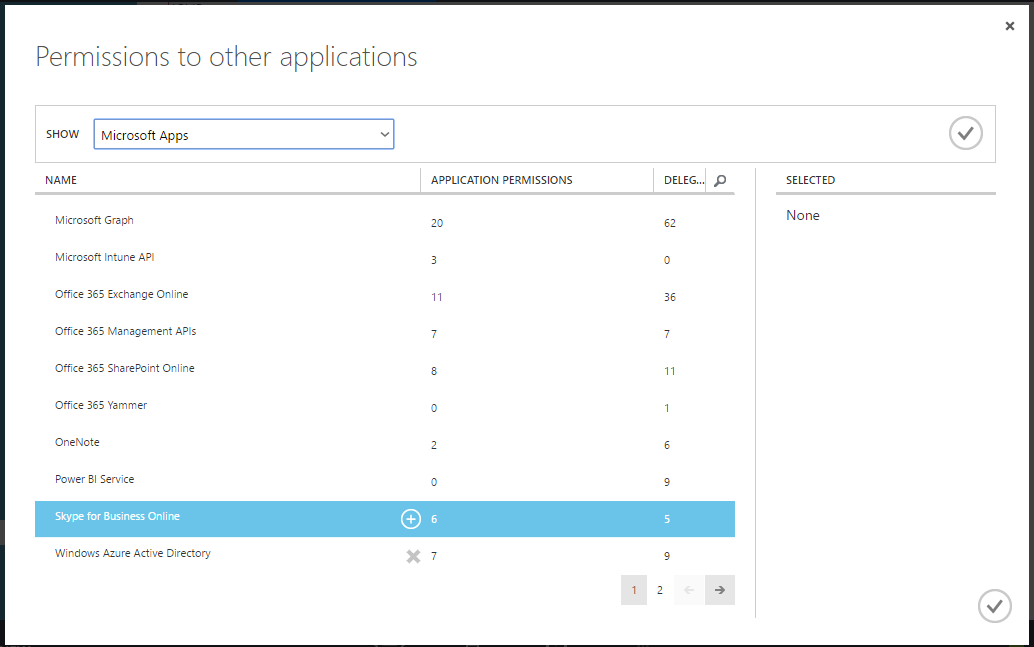
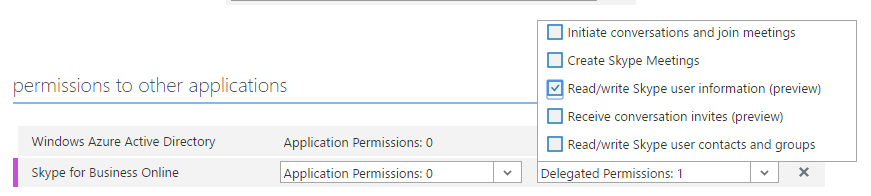
Click OK, and then under "Delegated permissions", check "Read/write Skype user information". Also you can select some other permissions according to your needs.
Reply URLs
When you start OAuth authentication, you have to navigate user to login.microsoftonline.com, and after user enters his credentials, he is redirected back to one of the allowed Reply URLs.
Query string (or in case of Implicit flow - a hash) is added to the Reply URL, containing access token which can be then used by the app to access Microsoft APIs.
Configuring Reply URLs is a simple matter of listing all the URLs that you need to be redirected to:

Implicit flow
Implicit flow is a simplified flow in OAuth where client secret is not used and security is ensured mostly by means of Reply URLs. The good thing about Implicit flow is that it can be used even in fully client-side applications that don't have any backend.
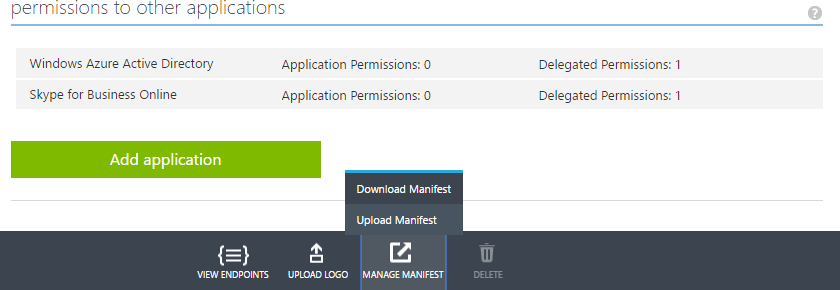
To configure implicit flow, click Manage manifest button, and download the manifest file:
Open it with any text editor and and change "oauth2AllowImplicitFlow" parameter to true:
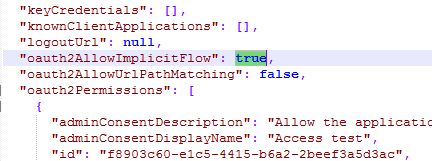
Finally, upload the manifest back.
Note: official documentation states that Implicit flow should be configured, but in fact I tried - and it turns out you can use Skype for Business with normal OAuth flow as well.
Multi-tenancy
If you plan to use this application not only for your own users, then you should change this application to be multi-tenant:
Please be aware that Skype for Business Online requires administrator consent, which means that administrator of an external Office 365 tenant should approve use of this application before it can be used by any of it's users.
Go to portal.azure.com -> Azure Active Directory -> App registrations, and click Add on the top panel:
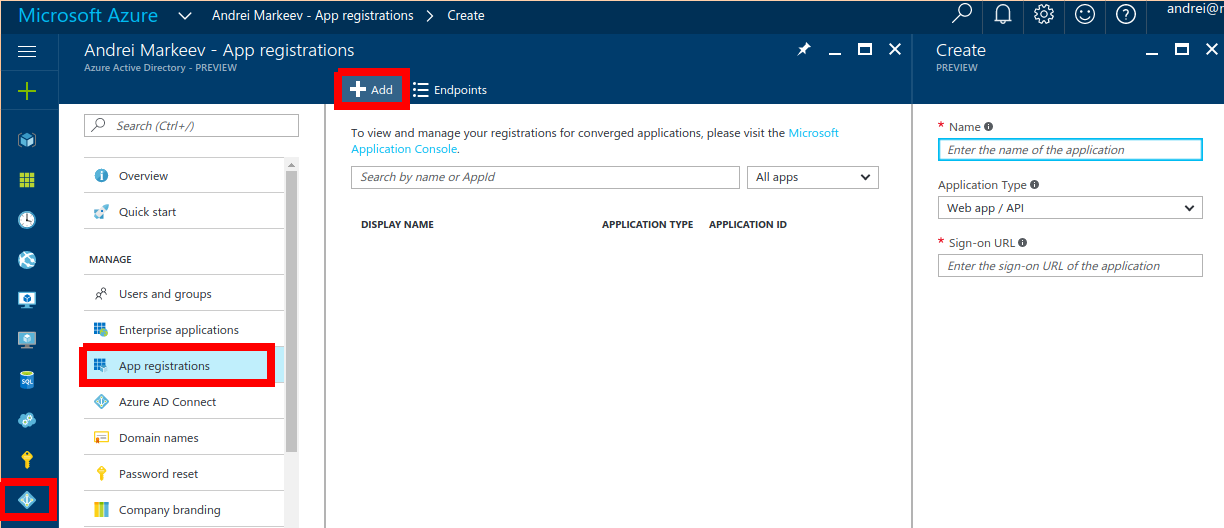
Enter application name and choose option "Web app / API".
Enter sign-in URL. This is usually the URL of page where you have your "Sign in with Skype for Business" button. This url is also automatically added to reply URLs. You can change it at any time later.
Finally, hit "Create" button!
Once application is created, it is necessary to configure it:
- Required permissions
- Reply URLs
- Implicit flow
- (optional) Multi-tenancy
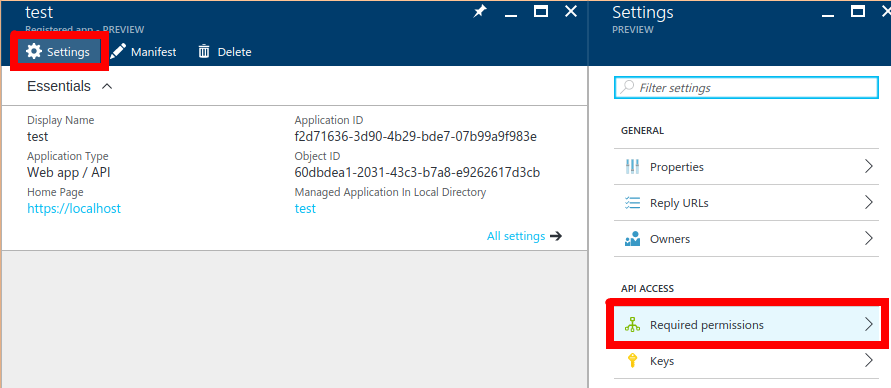
Required permissions
We need to access Skype for Business Online, so we need to specify that our app requires this access. It is done by going to the newly created application -> Settings button on top bar -> Required permissions.
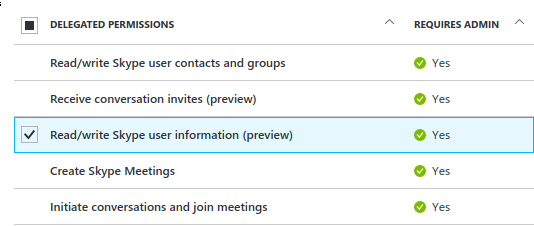
Now at the time of writing, there's a funny bug that you cannot find correct API by searching for "Skype for Business", you should instead search for "Microsoft.Lync". Like this:

Ok, now hit "Select", and on the next page, under "Delegated permissions", check "Read/write Skype user information". Also you can check some other permissions according to your needs.
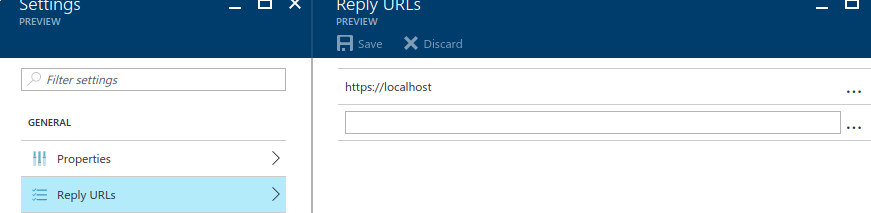
Reply URLs
When you start OAuth authentication, you have to navigate user to login.microsoftonline.com, and after user enters his credentials, he is redirected back to one of the allowed Reply URLs.
Query string (or in case of Implicit flow - a hash) is added to the Reply URL, containing access token which can be then used by the app to access Microsoft APIs.
Configuring Reply URLs is a simple matter of listing all the URLs that you need to be redirected to:
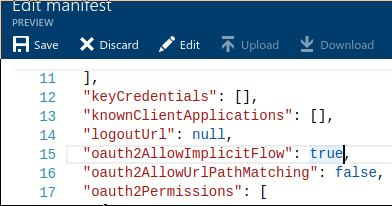
Implicit flow
Implicit flow is a simplified flow in OAuth where client secret is not used and security is ensured mostly by means of Reply URLs. The good thing about Implicit flow is that it can be used even in fully client-side applications that don't have any backend.
To configure implicit flow, click Edit manifest button, and change "oauth2AllowImplicitFlow" parameter to true:
Note: official documentation states that Implicit flow should be configured, but in fact I tried - and it turns out you can use Skype for Business with normal OAuth flow as well.
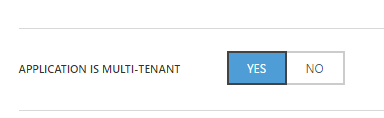
Multi-tenancy
If you plan to use this application not only for your own users, then you should change this application to be multi-tenant (under Properties):
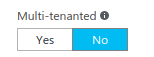
Please be aware that Skype for Business Online requires administrator consent, which means that administrator of an external Office 365 tenant should approve use of this application before it can be used by any of it's users.
Now the Azure application is created and configured, and we can start the autodiscovery dance!
Authentication and autodiscovery
Most Office 365 APIs have single API url, e.g. for Outlook it is "https://outlook.office.com/api/".
Skype for Business Online uses a different approach: it has a main hub "https://webdir.online.lync.com", but if you try using it's API it will "redirect" you to second hub, and then second hub similarly can redirect you to the third and so on, until you get to the real hub with URL resembling "https://webpoolabc123.infra.lync.com" where you can finally use the API.
Additional difficulty with this is that you have to perform OAuth authentication on every hub in the chain.
In overall, the algorithm looks like this:
- Determine first hub in the chain
- Authenticate for accessing a hub
- From the page where redirect URL points, get access token
- Access user autodiscovery using access token
- Loop to step 2
1. Determine first hub in the chain
Do determine the first hub in the chain, you should issue the following request:
GET /autodiscover/autodiscoverservice.svc/root HTTP/1.1
Host: webdir.online.lync.com:443
Code example in Javascript with XMLHttpRequest:
// parameters
var url = "https://webdir.online.lync.com/autodiscover/autodiscoverservice.svc/root";

// perform ajax request
var xmlhttp = new XMLHttpRequest();
xmlhttp.onreadystatechange = function() {
    if (xmlhttp.readyState == XMLHttpRequest.DONE ) {
        show(xmlhttp.responseText);
    }
};
xmlhttp.open("GET", url, true);
xmlhttp.send();
All code examples in this article are runnable. If you change the code, it is saved in localStorage of your browser, so that it is accessible after page refresh (because OAuth2 flow requires redirecting from page and back).
If everything is successful, you'll see something like this:
{ "_links": {
  "self":
    {"href":"https://webdir0e.online.lync.com/Autodiscover/AutodiscoverService.svc/root"},
  "user":
    {"href":"https://webdir0e.online.lync.com/Autodiscover/AutodiscoverService.svc/root/oauth/user"},
  "xframe":
    {"href":"https://webdir0e.online.lync.com/Autodiscover/XFrame/XFrame.html"}
}}
This means that this "https://webdir0e.online.lync.com" is our first hub - enter it into the resourceName in the next step.
2. Authenticate for accessing a hub
OAuth2 authentication flow requires redirecting to Microsoft URL specifying redirect URL where user will be redirected back after the authentication.
// parameters
var clientId = 'your application ID here';
var redirectUri = 'your redirect URL here';
var resourceName = 'url of the hub';

// nonce
var secret = Math.random().toString(36).substr(2, 10);
localStorage.setItem('skype4b_secret', secret);

var url = 'https://login.microsoftonline.com/common/oauth2/authorize?';
url += 'response_type=token';
url += '&client_id=' + clientId;
url += '&redirect_uri=' + redirectUri;
url += '&resource=' + resourceName;
url += '&state=' + secret;
document.location.href = url;
So basically this creates a correct OAuth2 login URL and navigates the user there. He authenticates, and gets redirected to the specified redirect URL.
Note: at the time of writing, official documentation states that request_type should be id_token, which is incorrect.
This script is editable, so you can try using your own client ID and redirect URL. If you temporarily configure redirect URL to point to "https://markeev.com/posts/skype4b" - then it will be possible to run the scripts right from this page using interactive editors. Please don't forget to remove this redirect URL when testing is done!
This script is editable, so you can try using your own Application ID (clientId) and reply URL (redirectUri) from the Azure Portal. If you temporarily configure redirect URL to point to "http://markeev.com/posts/skype4b" - then it will be possible to run the scripts right from this page using interactive editors. Please don't forget to remove this redirect URL when testing is done!
Possible behaviours
- If you're logged with several accounts - you'll be able to select one of them.
- If you're not logged in, you'll get a login prompt
- If you're logged in as a tenant administrator, and you haven't consented this application yet, you will be redirected to the administrator consent page.
Possible errors
- "AADSTS90093: Calling principal cannot consent due to lack of permissions." - you're logged in with a non-admin account, and this application has not been consented by the administrator yet.
- "AADSTS50011: The reply address 'http://your-reply-url' does not match the reply addresses configured for the application" - you forgot to configure reply URLs (see Create Azure AD application) or neither of them match with the URL you specified in the request.
Skype for Business Online uses admin consent, so until administrator of your tenant has approved the application, none of the users of this tenant will be able to use it.
Administrator consent page looks like this:
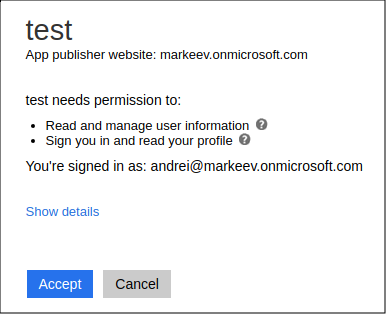
If everything is successful, you'll be redirected to your reply URL with added hash:
http://your-redirect-url/#access_token=eyJ0eXAiOiJ...
&token_type=Bearer
&expires_in=3599
&state=fyx1484dtg
&session_state=da020b43-2c9e-471e-8700-a4909e79ff4e
3. Get access token
The following simple code can be used for parsing response hash (put this code on the page the redirect URL points to):
var access_token = "";
var secret_returned = "";
var error = "";
var error_description = "";
for (var p of document.location.hash.substr(1).split('&')) {
    if (p.indexOf('access_token=') == 0)
        access_token = p.substr('access_token='.length);
    else if (p.indexOf('state=') == 0)
        secret_returned = p.substr('state='.length);
    else if (p.indexOf('error=') == 0)
        error = p.substr('error='.length);
    else if (p.indexOf('error_description=') == 0)
        error_description = p.substr('error_description='.length);
}

var secret = localStorage.getItem('skype4b_secret');
localStorage.removeItem('skype4b_secret');
if (!error && secret != secret_returned)
    error = "Secrets don't match!";
if (error) {
    alert(error + ": " + decodeURIComponent(error_description));
} else {
    show(access_token);
}
Possible errors
- "AADSTS70005: response_type 'token' is not enabled for the application" - you forgot to enable implicit flow, see Create Azure AD application.
- "AADSTS65005: The client application has requested access to resource https://webdir.online.lync.com. This request has failed because the client has not specified this resource in its requiredResourceAccess list." - you forgot to add Skype for Business Online to required permissions of the app, see Create Azure AD application.
4. Access user autodiscovery URL using access token
Note: Starting from this step onwards, Skype for Business forces CORS, and it seems there's no way to whitelist your domains in S4B Online, thus requests have to be done from server (or from mobile devices).
Here is the RAW request you should execute from your backend:
GET /autodiscover/autodiscoverservice.svc/root/oauth/user HTTP/1.1
Host: hub_url:443
Authorization: Bearer access_token
Accept: application/json
Content-Type: application/json
(be sure to change
hub_url to your hub URL, e.g. webdir0A.online.lync.com and replace access_token with your access token you got on previous step)
Example script below uses a simple php proxy that I wrote to bypass CORS (it's source code can be found on GitHub).
// parameters
var hub_url = "url of the hub";
var access_token = "your access token here";

var url = hub_url + "/autodiscover/autodiscoverservice.svc/root/oauth/user";

// perform request through proxy
proxyGet(access_token, url, function(xmlhttp) {
    if (xmlhttp.readyState == XMLHttpRequest.DONE ) {
        if (xmlhttp.status == 403)
            show(xmlhttp.getResponseHeader("X-Ms-diagnostics"));
        else if (xmlhttp.status == 200)
            show(xmlhttp.responseText);
        else
            show("Returned:" + xmlhttp.status);
    }
});

function proxyGet(access_token, url, callback)
{
    var url = "https://markeev.com/posts/skype4b/proxy.php?url="
                + url + "&access_token=" + access_token;

    var xmlhttp = new XMLHttpRequest();
    xmlhttp.onreadystatechange = function() {
        if (xmlhttp.readyState == XMLHttpRequest.DONE)
            callback(xmlhttp);
    };
    xmlhttp.open("GET", url, true);
    xmlhttp.send();
}
Possible outcomes
- If node "redirect" is returned - get url of the next hub in the chain, and go to step 2
- If node "applications" is returned - congratulations, autodiscovery is finished, we found our hub!
Example of response with redirect node:
{"_links":{
  "self":
    {"href":"https://webdir2e.online.lync.com/Autodiscover/AutodiscoverService.svc/root/user"},
  "xframe":
    {"href":"https://webdir0E.online.lync.com/Autodiscover/AutodiscoverService.svc/root/xframe"},
  "redirect":
    {"href":"https://webdir0E.online.lync.com/Autodiscover/AutodiscoverService.svc/root"}
}}
Example of response with applications node:
{"_links":{
  "self":
    {"href":"https://webpoolab12e34.infra.lync.com/Autodiscover/AutodiscoverService.svc/root/oauth/user"},
  "applications":
    {"href":"https://webpoolab12e34.infra.lync.com/ucwa/oauth/v1/applications","revision":"2"},
  "xframe":
    {"href":"https://webpoolab12e34.infra.lync.com/Autodiscover/XFrame/XFrame.html"}
}}
Initialize API session
One last time, we need to again authenticate.
So having resourceName = "https://webpoolXXXXXX.infra.lync.com", complete steps 2. Authenticate for accessing a hub and 3. Get access token.
Once this is done, we can access the applications endpoint and create our application. Application is something like a session.
Raw request should be:
POST /ucwa/oauth/v1/applications HTTP/1.1 Host: webpoolXXXXXX.infra.lync.com:443 Authorization: Bearer access_token Accept: application/json Content-Type: application/json Content-Length: length of post body{ UserAgent: "your user agent", Culture: "en-US", EndpointId: "random_guid" }
Equivalent script using proxy:
// parameters
var hub_url = "https://webpoolXXXXXX.infra.lync.com";
var access_token = "your access token";

var url = hub_url + "/ucwa/oauth/v1/applications";
var random_guid = 'xxxxxxxx-xxxx-4xxx-yxxx-xxxxxxxxxxxx'
    .replace(/[xy]/g, function(c) {
        var r = Math.random()*16|0, v = c == 'x' ? r : (r&0x3|0x8);
        return v.toString(16);
    });

proxyPost(access_token, url, {
  UserAgent: "test",
  Culture: "en-US",
  EndpointId: random_guid
}, function(xmlhttp) {
    if (xmlhttp.status == 403)
        show(xmlhttp.getResponseHeader("X-Ms-diagnostics"));
    else if (xmlhttp.status == 201)
        show(xmlhttp.responseText);
    else
        show("Returned:" + xmlhttp.status);
});

function proxyPost(access_token, url, data, callback)
{
    var url = "https://markeev.com/posts/skype4b/proxy.php?url="
                + url + "&access_token=" + access_token;

    var xmlhttp = new XMLHttpRequest();
    xmlhttp.onreadystatechange = function() {
        if (xmlhttp.readyState == XMLHttpRequest.DONE ) {
            callback(xmlhttp);
        }
    };
    xmlhttp.open("POST",  url, true);
    xmlhttp.setRequestHeader("Content-type", "application/json");
    xmlhttp.send(JSON.stringify(data));
}
If request is successful, you'll get a document of the following structure:
{
    "culture":"en-US",
    "userAgent":"test",
    "type":"Browser",
    "endpointId":"...",
    "instanceId":"default",
    "id":"10291887270",
    "_links":{
        "self":{"href":"..."},
        "policies":{"href":"..."},
        "batch":{"href":"..."},
        "events":{"href":"..."}
    },
    "_embedded":{
        "me":{
            "uri":"sip:[email protected]",
            "name":"Andrei Markeev",
            "emailAddresses":["[email protected]"],
            "mobilePhoneNumber":"tel:...",
            "_links":{
                "self":{"href":"..."},
                "makeMeAvailable":{"href":"...","revision":"2"},
                "photo":{"href":"..."}
            },
            "rel":"me"
        }
    },
    "rel":"application",
    "etag":"4155000218",
    "expires":"\/Date(1480511752302)\/"
}
Retrieve user presence
Now, you would think, hooray, finally we are there and now everything is easy, just use the API, and you are good.
Not so fast, my friend! There are still some gotchas left.
Link to the presence can be determined from the information we got on the previous step:
var self_url = appData._embedded.me._links.self.href
Raw request:
GET self_url/presence HTTP/1.1
Host: hub_url:443
Authorization: Bearer access_token
Accept: application/json
Content-Type: application/json
Script using proxy:
// parameters
var hub_url = "the url of the hub";
var access_token = "your access token";
var self_url = "self link from previous step";

var url = hub_url + self_url + "/presence";

// perform request through proxy
proxyGet(access_token, url, function(xmlhttp) {
    if (xmlhttp.readyState == XMLHttpRequest.DONE ) {
        if (xmlhttp.status == 403)
            show(xmlhttp.getResponseHeader("X-Ms-diagnostics"));
        else if (xmlhttp.status == 409)
            show(xmlhttp.responseText);
        else if (xmlhttp.status == 200)
            show(xmlhttp.responseText);
        else
            show("Returned:" + xmlhttp.status);
    }
});

function proxyGet(access_token, url, callback)
{
    var url = "https://markeev.com/posts/skype4b/proxy.php?url="
                + url + "&access_token=" + access_token;

    var xmlhttp = new XMLHttpRequest();
    xmlhttp.onreadystatechange = function() {
        if (xmlhttp.readyState == XMLHttpRequest.DONE)
            callback(xmlhttp);
    };
    xmlhttp.open("GET", url, true);
    xmlhttp.send();
}
Unfortunately, result of this operation will be error "MakeMeAvailableRequired".
I haven't found any way around it: you need to call "MakeMeAvailable" api endpoint before you can retrieve the presence of the user. And this will of course change user presence, so if user was Away he will become Available...
Of course in Skype for Business client it makes sense, but in custom applications this "feature" can become extremely inconvenient.
But at least it preserves statuses like Busy! So let's make this "MakeMeAvailable" call:
Raw request:
POST self_url/makeMeAvailable HTTP/1.1 Host: hub_url:443 Authorization: Bearer access_token Accept: application/json Content-Type: application/json Content-Length: length of post body{}
Script using proxy:
// parameters are same as in previous method
var hub_url = "the url of the hub";
var access_token = "your access token";
var self_url = "self link";

var url = hub_url + self_url + "/makeMeAvailable";

proxyPost(access_token, url, {}, function(xmlhttp) {
    if (xmlhttp.status == 403)
        show(xmlhttp.getResponseHeader("X-Ms-diagnostics"));
    else if (xmlhttp.status == 200)
        show(xmlhttp.responseText);
    else
        show("Returned:" + xmlhttp.status);
});

function proxyPost(access_token, url, data, callback)
{
    var url = "https://markeev.com/posts/skype4b/proxy.php?url="
                + url + "&access_token=" + access_token;

    var xmlhttp = new XMLHttpRequest();
    xmlhttp.onreadystatechange = function() {
        if (xmlhttp.readyState == XMLHttpRequest.DONE ) {
            callback(xmlhttp);
        }
    };
    xmlhttp.open("POST",  url, true);
    xmlhttp.setRequestHeader("Content-type", "application/json");
    xmlhttp.send(JSON.stringify(data));
}
Now if you return to the previous step and try running it once again - voila!, it will finally succeed, returning the following JSON:
{
    "availability":"Online",
    "_links": {
        "self": {"href":"/ucwa/oauth/v1/applications/<app id>/me/presence"}
    },
    "rel":"presence"
}
Some of possible values of the "availability" field are presented below:
- Online
- DoNotDisturb
- Busy
- Presenting
- InAMeeting
- InACall
- InAConferenceCall
- Away
- Offline
Monitoring events
One possible option for monitoring events is calling "/me/presence" with a certain interval, but it is rather cumbersome of course, and there's a much better way!
Skype for Business API has special "/events" endpoint, that uses long polling and thus it is possible to get almost instant status updates.
Correct link to events endpoint is returned when creating the application (see Initialize API session step) and looks like this:
/ucwa/oauth/v1/applications/<app id>/events?ack=1&key=<long identifier here>
It is very important to also add "&timeout=180" to this link, so that request will wait for two minutes if nothing happens with the presence and then you'll need to renew it. But if presence changes during this time, request will return immediately.
Raw request:
GET events_url&timeout=180 HTTP/1.1
Host: hub_url:443
Authorization: Bearer access_token
Accept: application/json
Content-Type: application/json
Script using proxy:
// parameters
var hub_url = "the url of the hub";
var access_token = "your access token";
var events_url = "events link from 'Initialize API session' step";

var url = hub_url + events_url + "&timeout=180";

// perform request through proxy
proxyGet(access_token, url, function(xmlhttp) {
    if (xmlhttp.readyState == XMLHttpRequest.DONE ) {
        if (xmlhttp.status == 403)
            show(xmlhttp.getResponseHeader("X-Ms-diagnostics"));
        else if (xmlhttp.status == 400)
            show(xmlhttp.responseText);
        else if (xmlhttp.status == 200)
            show(xmlhttp.responseText);
        else
            show("Returned:" + xmlhttp.status);
    }
});

function proxyGet(access_token, url, callback)
{
    var url = "https://markeev.com/posts/skype4b/proxy.php?url="
                + url + "&access_token=" + access_token;

    var xmlhttp = new XMLHttpRequest();
    xmlhttp.onreadystatechange = function() {
        if (xmlhttp.readyState == XMLHttpRequest.DONE)
            callback(xmlhttp);
    };
    xmlhttp.open("GET", url, true);
    xmlhttp.send();
}
Running this code first time will most likely yield results right away, because you just made "MakeMeAvailable" request:
{
    "_links": {
        "self": { "href":"/ucwa/oauth/v1/applications/<app id>/events?ack=1&key=<key>"},
        "next": { "href":"/ucwa/oauth/v1/applications/<app id>/events?ack=2&key=<key>"}
    },
    "sender": [
        {
            "rel": "me",
            "href": "/ucwa/oauth/v1/applications/<app id>/me",
            "events": [
                {"link":{"rel":"me","href":"/ucwa/oauth/v1/applications/<app id>/me"},"type":"updated"},
                {"link":{"rel":"presence","href":"/ucwa/oauth/v1/applications/<app id>/me/presence"},"type":"added"},
                {"link":{"rel":"note","href":"/ucwa/oauth/v1/applications/<app id>/me/note"},"type":"added"},
                {"link":{"rel":"location","href":"/ucwa/oauth/v1/applications/<app id>/me/location"},"type":"added"}
            ]
        }
    ]
}
As you can see, the response aggregates all events which happened starting from creation of the application.
Notice: next time when requesting the events endpoint you should use the "next" link.
Running this code next time will not yield results instantly though. It will wait until some change happens (you can test this by going to Skype for Business client and changing your status there) or otherwise return by timeout.
If timeout was reached - so two minutes passed, you will get the response with the following structure:
{
    "_links": {
        "self": { "href": "/ucwa/oauth/v1/applications/<app id>/events?ack=1&key=<key>"},
        "next": { "href": "/ucwa/oauth/v1/applications/<app id>/events?ack=2&key=<key>"}
    },
    "sender":[]
}
Also the "/events" endpoint might return:
- 404 - this means that application has expired and was deleted, and you need to create a new one
- 401 - if authentication token has expired and you need to authenticate again (no need to go through all the autodiscovery procedure - authenticate on the final hub of the chain and you'll be fine)
Other API endpoints
Information about other API endpoints is available on MSDN:
Conclusion
Skype for Business Online API is quite complex, so you should expect that integrating Skype for Business with your application will take some time. But at least now you know that it is possible.
Comments
comments powered by Disqus