| RibbonCustomAction |
RibbonCustomAction class simplifies syntax for creating and managing ribbons through SharePoint feature receivers.
Because of using special definition classes, Fluent Ribbon API brings to developers an alternative way for ribbon creation.
Comparing to XML definitions (SharePoint native way), code definitions are much more flexible, compact and documented. Intellisense for C# code is, again, much better.
Finally, Fluent Ribbon API has qualitative run-time Validation of it's definitions. That is very important, because SharePoint itself often hides errors or does not provide appropriate exception messages.
Creating a simple demo
Create new SharePoint Empty Project in Visual Studio 2010
Add reference to FluentRibbon.dll (or FluentRibbon.Sandboxed.dll for sandboxed solutions)
Add FluentRibbon.dll (or FluentRibbon.Sandboxed.dll) into GAC deployment list (Package.package, 'Advanced' tab)
Right-click on 'Features' project folder and select 'Add Feature'
Right-click on 'Feature1' and select 'Add Event Receiver'
Go to generated Feature1.EventReceiver.cs class and uncomment FeatureActivated and FeatureDeactivating methods overrides.
Create some ribbon elements definitions. Tabs, control groups, and all the control types are now supported as elements for RibbonCustomAction.
Instantiate RibbonCustomAction class.
Use AddTab, AddTabToContextualGroup, ReplaceTab, AddControlGroup, ReplaceControlGroup, AddControl and ReplaceControl methods to add your ribbon elements to the RibbonCustomAction instance.
After adding all the definition into the instance, you should provision your custom action to specific location, using Provision method.
This method has many overloads, so please, read intellisense documentation carefully to select the appropriate overload. For example, you can provision your customizations directly to list instance.
[Guid("4e0a75de-9dc0-4e2a-b7c3-2d6932bf7707")]
public class Feature1EventReceiver : SPFeatureReceiver
{
    Guid ReceiverGuid { get { return new Guid("4e0a75de-9dc0-4e2a-b7c3-2d6932bf7707"); } }

    public override void FeatureActivated(SPFeatureReceiverProperties properties)
    {
        SPWeb web = (properties.Feature.Parent as SPSite).RootWeb;

        var button1 = ControlLibrary.CreateRandomButton();
        var button2 = ControlLibrary.CreateRandomButton();
        var button3 = ControlLibrary.CreateRandomButton();

        var group = new GroupDefinition()
        {
            Id = "MyGroup",
            Title = "Custom controls",
            Template = Libraries.GroupTemplateLibrary.SimpleTemplate,
            Controls = new ControlDefinition[]
            {
                button2,
                button3
            }
        };

        var ribbonCustomAction = new RibbonCustomAction();

        ribbonCustomAction.AddControlGroup(group, SPRibbonIds.ListItem.Id, 25);

        // We need assign TemplateAlias manually to buttons, if they will be deployed separately
        button1.TemplateAlias = "o1";
        ribbonCustomAction.AddControl(button1, SPRibbonIds.ListItem.Groups.Manage.Id, 1);

        ribbonCustomAction.Provision(ReceiverGuid, web, ListTypes.GenericList);

    }


    public override void FeatureDeactivating(SPFeatureReceiverProperties properties)
    {
        SPWeb web = (properties.Feature.Parent as SPSite).RootWeb;
        RibbonCustomAction.RemoveAllCustomizations(web, ReceiverGuid);
    }

}
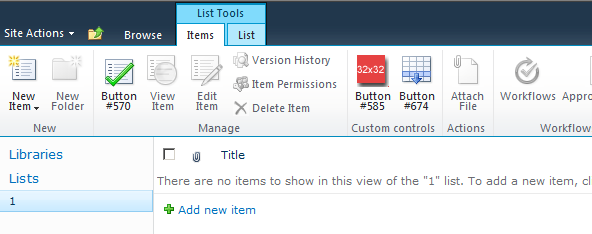
You will see the following result after deployment of this code:
